모든 인터넷 상호작용에는 IP 주소 사용이 필요합니다. 웹사이트는 이 IP 주소를 통해 사용자(들)를 식별하고, 사용자의 위치 및 ISP, 시간대, 기기 유형 등의 메타데이터를 파악합니다. 웹 서버는 이 정보를 활용하여 콘텐츠나 리소스를 맞춤화하거나 제한합니다. 즉, 웹 스크래핑 시 웹사이트는 트래픽 패턴이나 행동이 비정상적, 봇 유사, 악의적이라고 판단될 경우 해당 IP 주소에서 발신된 요청을 차단할 수 있습니다. 다행히 프록시 서버가 해결책이 될 수 있습니다.
프록시 서버는 사용자와 인터넷 사이의 관문 역할을 하는 중개 서버입니다. 사용자로부터 요청을 수신하여 웹 리소스로 전달한 후, 가져온 데이터를 사용자에게 반환합니다. 프록시 서버는 실제 IP 주소를 숨겨 보안, 프라이버시 및 익명성을 강화함으로써 신중하게 브라우징하고 스크래핑할 수 있도록 지원합니다.
프록시 서버는 IP 주소를 변경하여 요청이 서로 다른 사용자로부터 오는 것처럼 보이게 함으로써 IP 차단도 우회하는 데 도움이 됩니다. 다른 지역에 위치한 프록시 서버를 사용하면 지리적 차단을 우회하여 영화나 뉴스 같은 지역별 콘텐츠에 접근할 수 있습니다.
이 글에서는 Go로 웹 스크래핑용 프록시 서버를 설정하는 방법을 배웁니다. 또한 Bright Data 프록시 서버와 이 서버가 해당 과정을 어떻게 간소화하는지 알아보게 됩니다.
프록시 서버 설정하기
이 튜토리얼에서는 Go로 작성된 웹 스크레이퍼 애플리케이션을 수정하여 로컬 또는 자체 호스팅 프록시 서버를 통해 It’s FOSS 웹사이트와 상호작용하는 방법을 배웁니다. 이 튜토리얼은 이미 Go 개발 환경이 설정되어 있다고 가정합니다.
시작하려면 오픈소스 프록시 서버 소프트웨어인 Squid를 사용하여 프록시 서버를 설정해야 합니다. 다른 프록시 서버 소프트웨어에 익숙하다면 그걸 사용해도 됩니다. 다음 글에서는 Fedora 39 Linux 시스템에서 Squid를 사용합니다. 대부분의 Linux 배포판에서는 Squid가 기본 저장소에 포함되어 있습니다. 운영체제에 필요한 패키지를 다운로드하려면 문서를 확인하세요.
터미널에서 다음 명령어를 실행하여 Squid를 설치하세요:
dnf install squid -yn
설치가 완료되면 다음 명령어로 서비스를 시작하세요:
sudo systemctl enable u002du002dnow squidn
다음 명령어로 서비스 상태를 확인하세요:
sudo systemctl status squidn
출력 결과는 다음과 같아야 합니다:
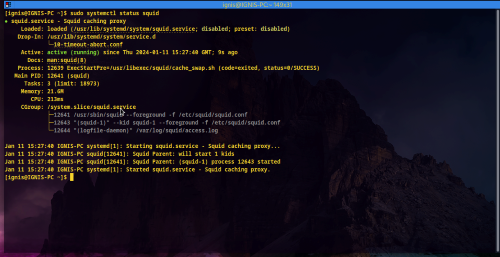
이는 서비스가 활성화되어 실행 중임을 나타냅니다. 기본적으로 Squid는 포트 3128에서 요청을 수신 대기합니다. 프록시 서버를 통한 통신을 테스트하려면 다음 curl 명령어를 사용하세요:
curl u002du002dproxy 127.0.0.1:3128 u0022http://lumtest.com/myip.jsonu0022n
응답은 다음과 같아야 합니다:
curl u002du002dproxy 127.0.0.1:3128 u0022http://lumtest.com/myip.jsonu0022n{u0022ipu0022:u0022196.43.196.126u0022,u0022countryu0022:u0022GHu0022,u0022asnu0022:{u0022asnumu0022:327695,u0022org_nameu0022:u0022AITIu0022},u0022geou0022:{u0022cityu0022:u0022u0022,u0022regionu0022:u0022u0022,u0022region_nameu0022:u0022u0022,u0022postal_codeu0022:u0022u0022,u0022latitudeu0022:8.1,u0022longitudeu0022:-1.2,u0022tzu0022:u0022Africa/Accrau0022}}nn
메타데이터에는 공용 IP 주소와 해당 IP를 소유한 국가 및 조직 정보가 포함되어야 합니다. 이는 작동하는 프록시 서버를 성공적으로 설치했음을 확인해 줍니다.
데모 스크레이퍼 설정
따라하기 쉽도록 간단한 Go 웹 스크레이퍼 애플리케이션이 이 GitHub 저장소에서 제공됩니다. 이 스크레이퍼는 오픈소스 소프트웨어 제품을 논의하는 인기 블로그인 It’s FOSS의 최신 블로그 게시물 제목, 발췌문 및 카테고리를 캡처합니다. 그런 다음 스크레이퍼는 Lumtest를 방문하여 웹과 상호작용하는 스크레이퍼의 HTTP 클라이언트가 사용하는 IP 주소에 대한 정보를 얻습니다. 동일한 로직이 Colly, goquery, Selenium이라는 세 가지 다른 Go 패키지를 사용하여 구현됩니다. 다음 섹션에서는 각 구현을 수정하여 프록시 서버를 사용하는 방법을 배울 것입니다.
먼저 선호하는 터미널/셸에서 다음 명령어를 실행하여 저장소를 복제하세요:
$ git clone https://github.com/rexfordnyrk/go_scrap_proxy.gitn
이 저장소는 두 개의 브랜치로 구성됩니다: 완성된 코드가 포함된 메인 브랜치와 수정할 초기 코드가 포함된 기본 ( basic ) 브랜치입니다. 다음 명령어로 기본 브랜치로 체크아웃하세요:
$ git checkout basicn
이 브랜치에는 프록시가 설정되지 않은 상태의 스크레이퍼 각 라이브러리 구현을 위한 세 개의 .go 파일이 포함되어 있습니다. 또한 Selenium 구현 스크레이퍼에 필요한 실행 파일 chromedriver도 포함되어 있습니다:
.nâââ chromedrivernâââ colly.gonâââ go.modnâââ goquery.gonâââ go.sumnâââ LICENSEnâââ README.mdnâââ selenium.gonn1 directory, 8 filesn
go run 명령어에 특정 파일 이름을 지정하여 각각을 개별적으로 실행할 수 있습니다. 예를 들어, 다음 명령어는 Colly를 사용한 스크레이퍼를 실행합니다:
go run ./colly.go n
출력 결과는 다음과 같아야 합니다:
$ go run ./colly.gonnArticle 0: {u0022categoryu0022:u0022Newsletter âï¸u0022,u0022excerptu0022:u0022Unwind your new year celebration with new open-source projects, and keep an eye on interesting distro updates.u0022,u0022titleu0022:u0022FOSS Weekly #24.02: Mixing AI With Linux, Vanilla OS 2, and Moreu0022}nArticle 1: {u0022categoryu0022:u0022Tutorialu0022,u0022excerptu0022:u0022Wondering how to use tiling windows on GNOME? Try the tiling assistant. Here's how it works.u0022,u0022titleu0022:u0022How to Use Tiling Assistant on GNOME Desktop?u0022}nArticle 2: {u0022categoryu0022:u0022Linux Commandsu0022,u0022excerptu0022:u0022The free command in Linux helps you gain insights on system memory usage (RAM), and more. Here's how to make good use of it.u0022,u0022titleu0022:u0022Free Command Examplesu0022}nArticle 3: {u0022categoryu0022:u0022Gaming ð®u0022,u0022excerptu0022:u0022Here are the best tips to make your Linux gaming experience enjoyable.u0022,u0022titleu0022:u00227 Tips and Tools to Improve Your Gaming Experience on Linuxu0022}nArticle 4: {u0022categoryu0022:u0022Newsletter âï¸u0022,u0022excerptu0022:u0022The first edition of FOSS Weekly in the year 2024 is here. See, what's new in the new year.u0022,u0022titleu0022:u0022FOSS Weekly #24.01: Linux in 2024, GDM Customization, Distros You Missed Last Yearu0022}nArticle 5: {u0022categoryu0022:u0022Tutorialu0022,u0022excerptu0022:u0022Wondering which init service your Linux system uses? Here's how to find it out.u0022,u0022titleu0022:u0022How to Check if Your Linux System Uses systemdu0022}nArticle 6: {u0022categoryu0022:u0022Ubuntuu0022,u0022excerptu0022:u0022Learn the logic behind each step you have to follow for adding an external repository in Ubuntu and installing packages from it.u0022,u0022titleu0022:u0022Installing Packages From External Repositories in Ubuntu [Explained]u0022}nArticle 7: {u0022categoryu0022:u0022Troubleshoot ð¬u0022,u0022excerptu0022:u0022Getting a warning that the boot partition has no space left? Here are some ways you can free up space on the boot partition in Ubuntu Linux.u0022,u0022titleu0022:u0022How to Free Up Space in /boot Partition on Ubuntu Linux?u0022}nArticle 8: {u0022categoryu0022:u0022Ubuntuu0022,u0022excerptu0022:u0022Wondering which Ubuntu version you're using? Here's how to check your Ubuntu version, desktop environment and other relevant system information.u0022,u0022titleu0022:u0022How to Check Ubuntu Version Details and Other System Informationu0022}nnCheck Proxy IP map[asn:map[asnum:29614 org_name:VODAFONE GHANA AS INTERNATIONAL TRANSIT] country:GH geo:map[city:Accra latitude:5.5486 longitude:-0.2012 lum_city:accra lum_region:aa postal_code: region:AA region_name:Greater Accra Region tz:Africa/Accra] ip:197.251.144.148]n
이 출력에는 It’s FOSS에서 스크랩한 모든 기사 정보가 포함됩니다. 출력 하단에는 스크레이퍼가 사용 중인 현재 연결 정보를 알려주는 Lumtest의 반환된 IP 정보가 표시됩니다. 세 가지 구현을 모두 실행하면 유사한 응답을 얻을 수 있습니다. 세 가지 모두 테스트를 마쳤다면 로컬 프록시를 사용한 스크레이핑을 시작할 준비가 된 것입니다.
로컬 프록시를 사용한 스크레이퍼 구현
이 섹션에서는 스크레이퍼의 세 가지 구현 방식을 모두 학습하고 프록시 서버를 사용하도록 수정하는 방법을 다룹니다. 각 .go 파일은 애플리케이션이 시작되는 main() 함수와 스크레이핑 지침을 포함하는 ScrapeWithLibrary() 함수로 구성됩니다.
로컬 프록시와 함께 goquery 사용하기
goquery는 Go용 라이브러리로, jQuery가 JavaScript에서 하는 것과 유사하게 HTML 문서를 파싱하고 조작하는 일련의 메서드와 기능을 제공합니다. HTML 페이지 구조를 탐색, 쿼리, 조작할 수 있게 해주므로 웹 스크래핑에 특히 유용합니다. 다만 이 라이브러리는 네트워크 요청이나 그 어떤 종류의 작업도 처리하지 않으므로, HTML 페이지를 직접 획득하여 제공해야 합니다.
goquery.go 파일로 이동하면 웹 스크레이퍼의 goquery 구현체를 찾을 수 있습니다. 선호하는 IDE나 텍스트 편집기로 열어주세요.
ScrapeWithGoquery() 함수 내부에서 HTTP 클라이언트의 전송 방식을 HTTP 프록시 서버의 URL로 수정해야 합니다. URL은 호스트명 또는 IP와 포트를 결합한 http://HOST:PORT 형식이어야 합니다.
이 파일에서 net/url 패키지를 반드시 임포트하세요. HTTP 클라이언트 정의를 다음 스니펫으로 붙여넣어 교체하십시오:
...nnfunc ScrapeWithGoquery() {n // Define the URL of the proxy servern proxyStr := u0022http://127.0.0.1:3128u0022nn // Parse the proxy URLn proxyURL, err := url.Parse(proxyStr)n if err != nil {n fmt.Println(u0022Error parsing proxy URL:u0022, err)n returnn }nn //Create an http.Transport that uses the proxyn transport := u0026http.Transport{n Proxy: http.ProxyURL(proxyURL),n }nn // Create an HTTP client with the transportn client := u0026http.Client{n Transport: transport,n }n n... n
이 코드 조각은 로컬 프록시 서버를 사용하도록 구성된 전송을 사용하여 HTTP 클라이언트를 수정합니다. IP 주소를 사용자의 프록시 서버 IP 주소로 반드시 교체하십시오.
이제 프로젝트 디렉터리에서 다음 명령어로 이 구현을 실행하세요:
go run ./goquery.gon
출력 결과는 다음과 같아야 합니다:
$ go run ./goquery.gonnArticle 0: {u0022categoryu0022:u0022Newsletter âï¸u0022,u0022excerptu0022:u0022Unwind your new year celebration with new open-source projects, and keep an eye on interesting distro updates.u0022,u0022titleu0022:u0022FOSS Weekly #24.02: Mixing AI With Linux, Vanilla OS 2, and Moreu0022}nArticle 1: {u0022categoryu0022:u0022Tutorialu0022,u0022excerptu0022:u0022Wondering how to use tiling windows on GNOME? Try the tiling assistant. Here's how it works.u0022,u0022titleu0022:u0022How to Use Tiling Assistant on GNOME Desktop?u0022}nArticle 2: {u0022categoryu0022:u0022Linux Commandsu0022,u0022excerptu0022:u0022The free command in Linux helps you gain insights on system memory usage (RAM), and more. Here's how to make good use of it.u0022,u0022titleu0022:u0022Free Command Examplesu0022}nArticle 3: {u0022categoryu0022:u0022Gaming ð®u0022,u0022excerptu0022:u0022Here are the best tips to make your Linux gaming experience enjoyable.u0022,u0022titleu0022:u00227 Tips and Tools to Improve Your Gaming Experience on Linuxu0022}nArticle 4: {u0022categoryu0022:u0022Newsletter âï¸u0022,u0022excerptu0022:u0022The first edition of FOSS Weekly in the year 2024 is here. See, what's new in the new year.u0022,u0022titleu0022:u0022FOSS Weekly #24.01: Linux in 2024, GDM Customization, Distros You Missed Last Yearu0022}nArticle 5: {u0022categoryu0022:u0022Tutorialu0022,u0022excerptu0022:u0022Wondering which init service your Linux system uses? Here's how to find it out.u0022,u0022titleu0022:u0022How to Check if Your Linux System Uses systemdu0022}nArticle 6: {u0022categoryu0022:u0022Ubuntuu0022,u0022excerptu0022:u0022Learn the logic behind each step you have to follow for adding an external repository in Ubuntu and installing packages from it.u0022,u0022titleu0022:u0022Installing Packages From External Repositories in Ubuntu [Explained]u0022}nArticle 7: {u0022categoryu0022:u0022Troubleshoot ð¬u0022,u0022excerptu0022:u0022Getting a warning that the boot partition has no space left? Here are some ways you can free up space on the boot partition in Ubuntu Linux.u0022,u0022titleu0022:u0022How to Free Up Space in /boot Partition on Ubuntu Linux?u0022}nArticle 8: {u0022categoryu0022:u0022Ubuntuu0022,u0022excerptu0022:u0022Wondering which Ubuntu version you're using? Here's how to check your Ubuntu version, desktop environment and other relevant system information.u0022,u0022titleu0022:u0022How to Check Ubuntu Version Details and Other System Informationu0022}nnCheck Proxy IP map[asn:map[asnum:29614 org_name:VODAFONE GHANA AS INTERNATIONAL TRANSIT] country:GH geo:map[city:Accra latitude:5.5486 longitude:-0.2012 lum_city:accra lum_region:aa postal_code: region:AA region_name:Greater Accra Region tz:Africa/Accra] ip:197.251.144.148]n
로컬 프록시와 함께 Colly 사용하기
Colly는 Go용 다목적 고효율 웹 스크래핑 프레임워크로, 사용자 친화적인 API와 goquery 같은 HTML 파싱 라이브러리와 원활한 연동으로 유명합니다. 그러나 goquery와 달리 다양한 네트워크 관련 동작을 처리하는 API를 지원 및 제공합니다. 여기에는 고속 스크래핑을 위한 비동기 요청, 로컬 캐싱, 웹 리소스 효율적·책임감 있는 사용을 위한 속도 제한, 쿠키 및 세션 자동 처리, 사용자 정의 가능한 사용자 에이전트, 포괄적인 오류 처리 등이 포함됩니다. 또한 프록시 전환 또는 로테이션을 통한 프록시 사용을 지원하며, 헤드리스 브라우저와의 연동을 통해 자바스크립트로 생성된 콘텐츠 스크래핑과 같은 작업으로 확장할 수 있습니다.
에디터나 IDE에서 colly.go 파일을 열고 ScrapeWithColly() 함수 내부에 새 수집기를 초기화한 직후에 다음 코드 줄을 붙여넣으세요:
...n // Define the URL of the proxy servern proxyStr := u0022http://127.0.0.1:3128u0022n // SetProxy sets a proxy for the collectorn if err := c.SetProxy(proxyStr); err != nil {n log.Fatalf(u0022Error setting proxy configuration: %vu0022, err)n }n n...n
이 스니펫은 Colly의 SetProxy() 메서드를 사용하여 네트워크 요청에 이 수집기 인스턴스가 사용할 프록시 서버를 정의합니다.
이제 프로젝트 디렉토리에서 다음 명령어로 이 구현을 실행하세요:
go run ./colly.gon
출력 결과는 다음과 같아야 합니다:
$ go run ./colly.gonnArticle 0: {u0022categoryu0022:u0022Newsletter âï¸u0022,u0022excerptu0022:u0022Unwind your new year celebration with new open-source projects, and keep an eye on interesting distro updates.u0022,u0022titleu0022:u0022FOSS Weekly #24.02: Mixing AI With Linux, Vanilla OS 2, and Moreu0022}nArticle 1: {u0022categoryu0022:u0022Tutorialu0022,u0022excerptu0022:u0022Wondering how to use tiling windows on GNOME? Try the tiling assistant. Here's how it works.u0022,u0022titleu0022:u0022How to Use Tiling Assistant on GNOME Desktop?u0022}nArticle 2: {u0022categoryu0022:u0022Linux Commandsu0022,u0022excerptu0022:u0022The free command in Linux helps you gain insights on system memory usage (RAM), and more. Here's how to make good use of it.u0022,u0022titleu0022:u0022Free Command Examplesu0022}nArticle 3: {u0022categoryu0022:u0022Gaming ð®u0022,u0022excerptu0022:u0022Here are the best tips to make your Linux gaming experience enjoyable.u0022,u0022titleu0022:u00227 Tips and Tools to Improve Your Gaming Experience on Linuxu0022}nArticle 4: {u0022categoryu0022:u0022Newsletter âï¸u0022,u0022excerptu0022:u0022The first edition of FOSS Weekly in the year 2024 is here. See, what's new in the new year.u0022,u0022titleu0022:u0022FOSS Weekly #24.01: Linux in 2024, GDM Customization, Distros You Missed Last Yearu0022}nArticle 5: {u0022categoryu0022:u0022Tutorialu0022,u0022excerptu0022:u0022Wondering which init service your Linux system uses? Here's how to find it out.u0022,u0022titleu0022:u0022How to Check if Your Linux System Uses systemdu0022}nArticle 6: {u0022categoryu0022:u0022Ubuntuu0022,u0022excerptu0022:u0022Learn the logic behind each step you have to follow for adding an external repository in Ubuntu and installing packages from it.u0022,u0022titleu0022:u0022Installing Packages From External Repositories in Ubuntu [Explained]u0022}nArticle 7: {u0022categoryu0022:u0022Troubleshoot ð¬u0022,u0022excerptu0022:u0022Getting a warning that the boot partition has no space left? Here are some ways you can free up space on the boot partition in Ubuntu Linux.u0022,u0022titleu0022:u0022How to Free Up Space in /boot Partition on Ubuntu Linux?u0022}nArticle 8: {u0022categoryu0022:u0022Ubuntuu0022,u0022excerptu0022:u0022Wondering which Ubuntu version you're using? Here's how to check your Ubuntu version, desktop environment and other relevant system information.u0022,u0022titleu0022:u0022How to Check Ubuntu Version Details and Other System Informationu0022}nnCheck Proxy IP map[asn:map[asnum:29614 org_name:VODAFONE GHANA AS INTERNATIONAL TRANSIT] country:GH geo:map[city:Accra latitude:5.5486 longitude:-0.2012 lum_city:accra lum_region:aa postal_code: region:AA region_name:Greater Accra Region tz:Africa/Accra] ip:197.251.144.148]nn
로컬 프록시와 함께 Selenium 사용하기
Selenium은 웹 애플리케이션 테스트에서 웹 브라우저 상호작용을 자동화하는 데 주로 사용되는 도구입니다. 버튼 클릭, 텍스트 입력, 웹 페이지에서 데이터 추출과 같은 작업을 수행할 수 있어 자동화된 상호작용으로 웹 콘텐츠를 스크래핑하는 데 이상적입니다. 실제 사용자 상호작용을 모방하는 것은 Selenium이 브라우저를 제어하는 데 사용하는 WebDriver를 통해 가능합니다. 이 예제는 Chrome을 사용하지만 Selenium은 Firefox, Safari, Internet Explorer를 포함한 다른 브라우저도 지원합니다.
셀레늄 웹드라이버 서비스를 사용하면 실제 브라우저처럼 웹과 상호작용할 때 기본 브라우저의 동작에 영향을 미치도록 프록시 및 기타 구성을 제공할 수 있습니다. 프로그래밍 방식으로 이는 selenium.Capabilities{} 정의를 통해 구성할 수 있습니다.
로컬 프록시와 함께 Selenium을 사용하려면 ScrapeWithSelenium() 내부의 selenium.go 파일을 편집하고 selelium.Capabilities{} 정의를 다음 스니펫으로 대체하십시오:
...nn // Define proxy settingsn proxy := selenium.Proxy{n Type: selenium.Manual,n HTTP: u0022127.0.0.1:3128u0022, // Replace with your proxy settingsn SSL: u0022127.0.0.1:3128u0022, // Replace with your proxy settingsn }nn // Configuring the WebDriver instance with the proxyn caps := selenium.Capabilities{n u0022browserNameu0022: u0022chromeu0022,n u0022proxyu0022: proxy,n }n n...n
이 코드 조각은 Selenium의 WebDriver 기능을 구성하는 데 사용되는 다양한 프록시 매개변수를 정의합니다. 다음 실행 시 프록시 연결이 사용됩니다.
이제 프로젝트 디렉토리에서 다음 명령어로 구현을 실행하세요:
go run ./selenium.gon
출력 결과는 다음과 같아야 합니다:
$ go run ./selenium.gonnArticle 0: {u0022categoryu0022:u0022Newsletter âï¸u0022,u0022excerptu0022:u0022Unwind your new year celebration with new open-source projects, and keep an eye on interesting distro updates.u0022,u0022titleu0022:u0022FOSS Weekly #24.02: Mixing AI With Linux, Vanilla OS 2, and Moreu0022}nArticle 1: {u0022categoryu0022:u0022Tutorialu0022,u0022excerptu0022:u0022Wondering how to use tiling windows on GNOME? Try the tiling assistant. Here's how it works.u0022,u0022titleu0022:u0022How to Use Tiling Assistant on GNOME Desktop?u0022}nArticle 2: {u0022categoryu0022:u0022Linux Commandsu0022,u0022excerptu0022:u0022The free command in Linux helps you gain insights on system memory usage (RAM), and more. Here's how to make good use of it.u0022,u0022titleu0022:u0022Free Command Examplesu0022}nArticle 3: {u0022categoryu0022:u0022Gaming ð®u0022,u0022excerptu0022:u0022Here are the best tips to make your Linux gaming experience enjoyable.u0022,u0022titleu0022:u00227 Tips and Tools to Improve Your Gaming Experience on Linuxu0022}nArticle 4: {u0022categoryu0022:u0022Newsletter âï¸u0022,u0022excerptu0022:u0022The first edition of FOSS Weekly in the year 2024 is here. See, what's new in the new year.u0022,u0022titleu0022:u0022FOSS Weekly #24.01: Linux in 2024, GDM Customization, Distros You Missed Last Yearu0022}nArticle 5: {u0022categoryu0022:u0022Tutorialu0022,u0022excerptu0022:u0022Wondering which init service your Linux system uses? Here's how to find it out.u0022,u0022titleu0022:u0022How to Check if Your Linux System Uses systemdu0022}nArticle 6: {u0022categoryu0022:u0022Ubuntuu0022,u0022excerptu0022:u0022Learn the logic behind each step you have to follow for adding an external repository in Ubuntu and installing packages from it.u0022,u0022titleu0022:u0022Installing Packages From External Repositories in Ubuntu [Explained]u0022}nArticle 7: {u0022categoryu0022:u0022Troubleshoot ð¬u0022,u0022excerptu0022:u0022Getting a warning that the boot partition has no space left? Here are some ways you can free up space on the boot partition in Ubuntu Linux.u0022,u0022titleu0022:u0022How to Free Up Space in /boot Partition on Ubuntu Linux?u0022}nArticle 8: {u0022categoryu0022:u0022Ubuntuu0022,u0022excerptu0022:u0022Wondering which Ubuntu version you're using? Here's how to check your Ubuntu version, desktop environment and other relevant system information.u0022,u0022titleu0022:u0022How to Check Ubuntu Version Details and Other System Informationu0022}nnCheck Proxy IP {u0022ipu0022:u0022197.251.144.148u0022,u0022countryu0022:u0022GHu0022,u0022asnu0022:{u0022asnumu0022:29614,u0022org_nameu0022:u0022VODAFONE GHANA AS INTERNATIONAL TRANSITu0022},u0022geou0022:{u0022cityu0022:u0022Accrau0022,u0022regionu0022:u0022AAu0022,u0022region_nameu0022:u0022Greater Accra Regionu0022,u0022postal_codeu0022:u0022u0022,u0022latitudeu0022:5.5486,u0022longitudeu0022:-0.2012,u0022tzu0022:u0022Africa/Accrau0022,u0022lum_cityu0022:u0022accrau0022,u0022lum_regionu0022:u0022aau0022}}nn
자체적으로 프록시 서버를 유지 관리할 수는 있지만, 다양한 지역별로 새 서버를 설정해야 하는 점, 기타 유지 관리 및 보안 문제 등 여러 요인으로 제한을 받게 됩니다.
Bright Data 프록시 서버
Bright Data는 다양한 웹 데이터 수집 목적에 활용 가능한 포괄적인 프록시 서버 및 서비스 세트를 갖춘 수상 경력에 빛나는 글로벌 프록시 네트워크 인프라를 제공합니다.
Bright Data 프록시 서버의 광범위한 글로벌 네트워크를 통해 다양한 국제 위치에서 데이터를 쉽게 접근하고 수집할 수 있습니다. Bright Data는 또한 3억 5천만 개 이상의 고유한 주거용, ISP, 데이터센터 및 모바일 프록시를 포함한 다양한 프록시 유형을 제공하며, 각각은 특정 웹 데이터 수집 작업에 대한 합법성, 속도 및 신뢰성과 같은 고유한 이점을 제공합니다.
또한 Bright Data 프록시 로테이션 시스템은 높은 익명성을 보장하고 탐지를 최소화하여 지속적이고 대규모의 웹 데이터 수집에 이상적입니다.
Bright Data로 주거용 프록시 설정하기
Bright Data로 주거용 프록시를 얻는 것은 쉽습니다. 무료 체험판에 가입하기만 하면 됩니다. 가입 후 다음과 같은 화면이 표시됩니다:
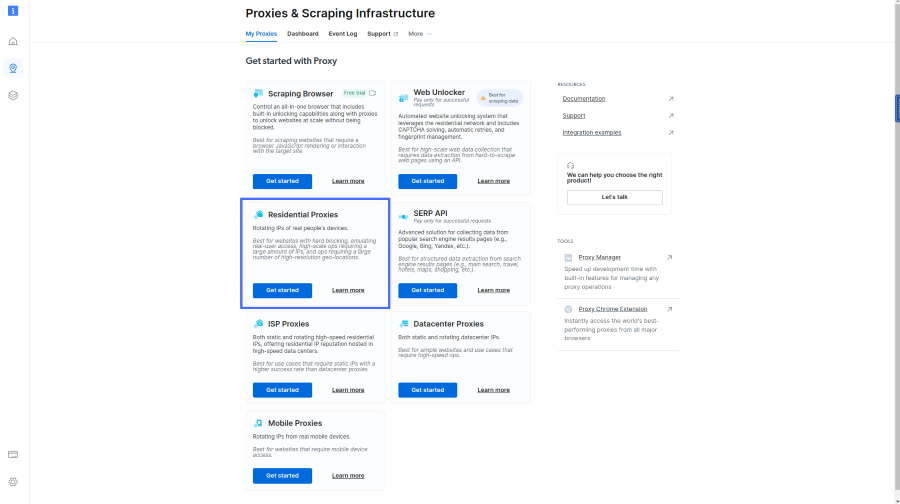
레지던셜 프록시용 ‘시작하기’ 버튼을 클릭하세요.
다음과 같은 양식을 작성하라는 메시지가 표시됩니다:
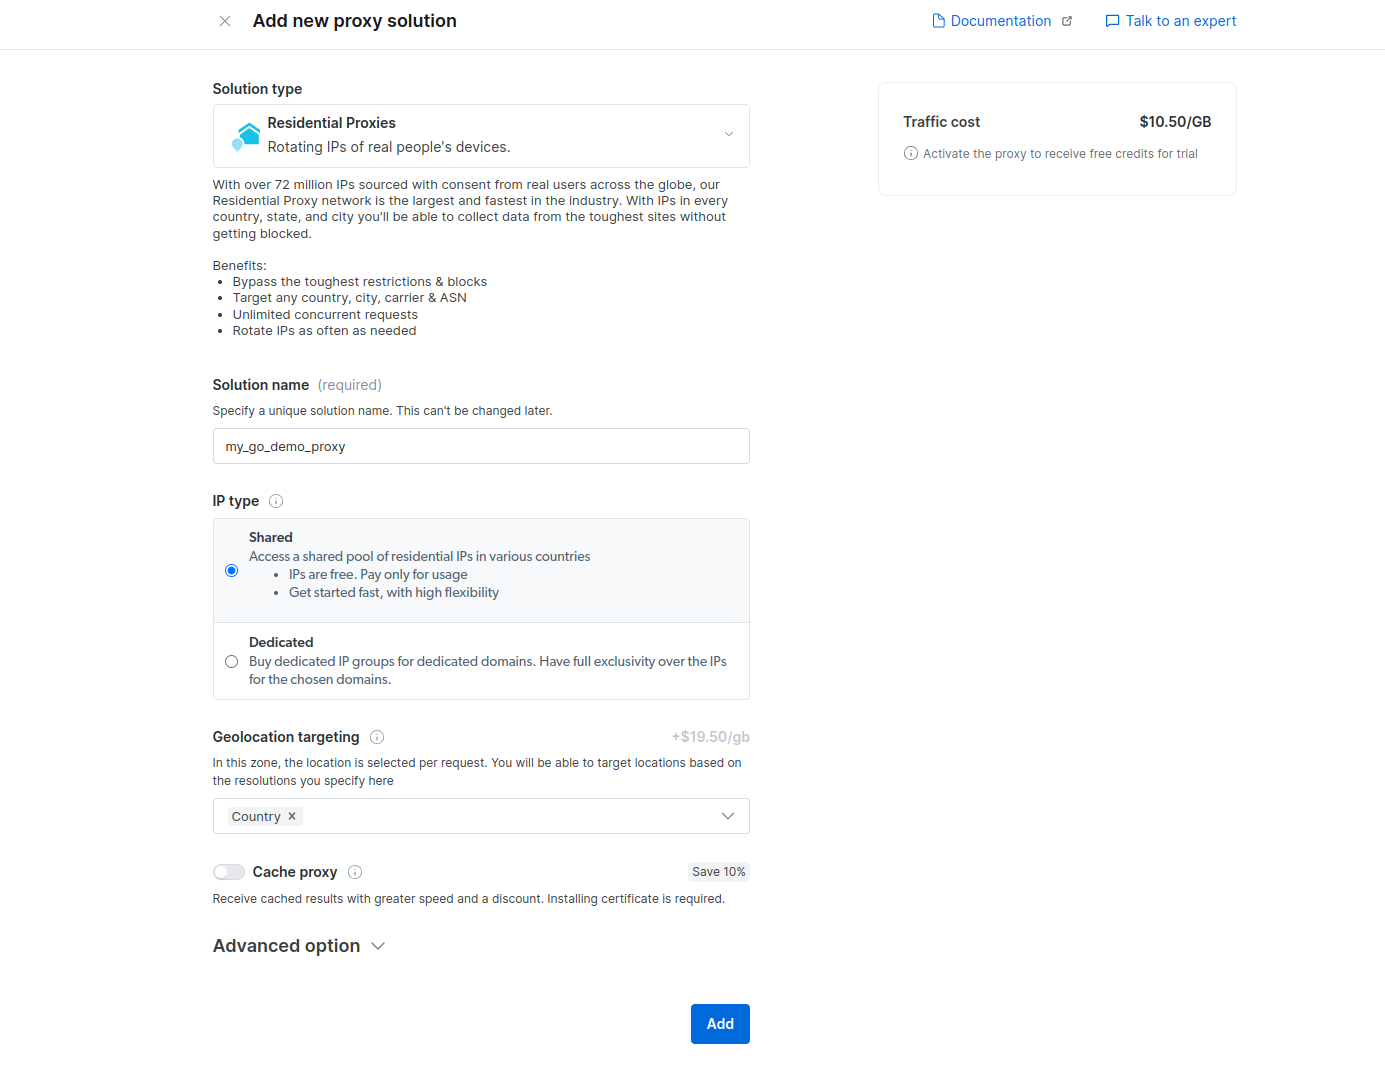
이 인스턴스에 이름을 지정하세요. 여기서는 my_go_demo_proxy입니다. 또한 프로비저닝할 IP 유형을 지정해야 합니다: 공유 프록시를 사용하려면 ‘공유’를 선택하세요. 그런 다음 웹 콘텐츠에 접근할 때 모방할 지리적 위치 수준을 지정하세요. 기본값은 국가 수준 또는 지역입니다. 요청한 웹 페이지가 캐시되도록 할지도 지정해야 합니다. 현재는 캐싱을 비활성화하세요.
이 정보를 입력한 후 ‘추가’를 클릭하여 주거용 프록시를 생성하고 프로비저닝하세요.
다음으로 주거용 프록시를 활성화해야 합니다. 단, 신규 사용자의 경우 먼저 결제 정보를 입력해야 합니다. 해당 단계를 완료한 후 대시보드로 이동하여 방금 생성한 주거용 프록시를 클릭하세요:
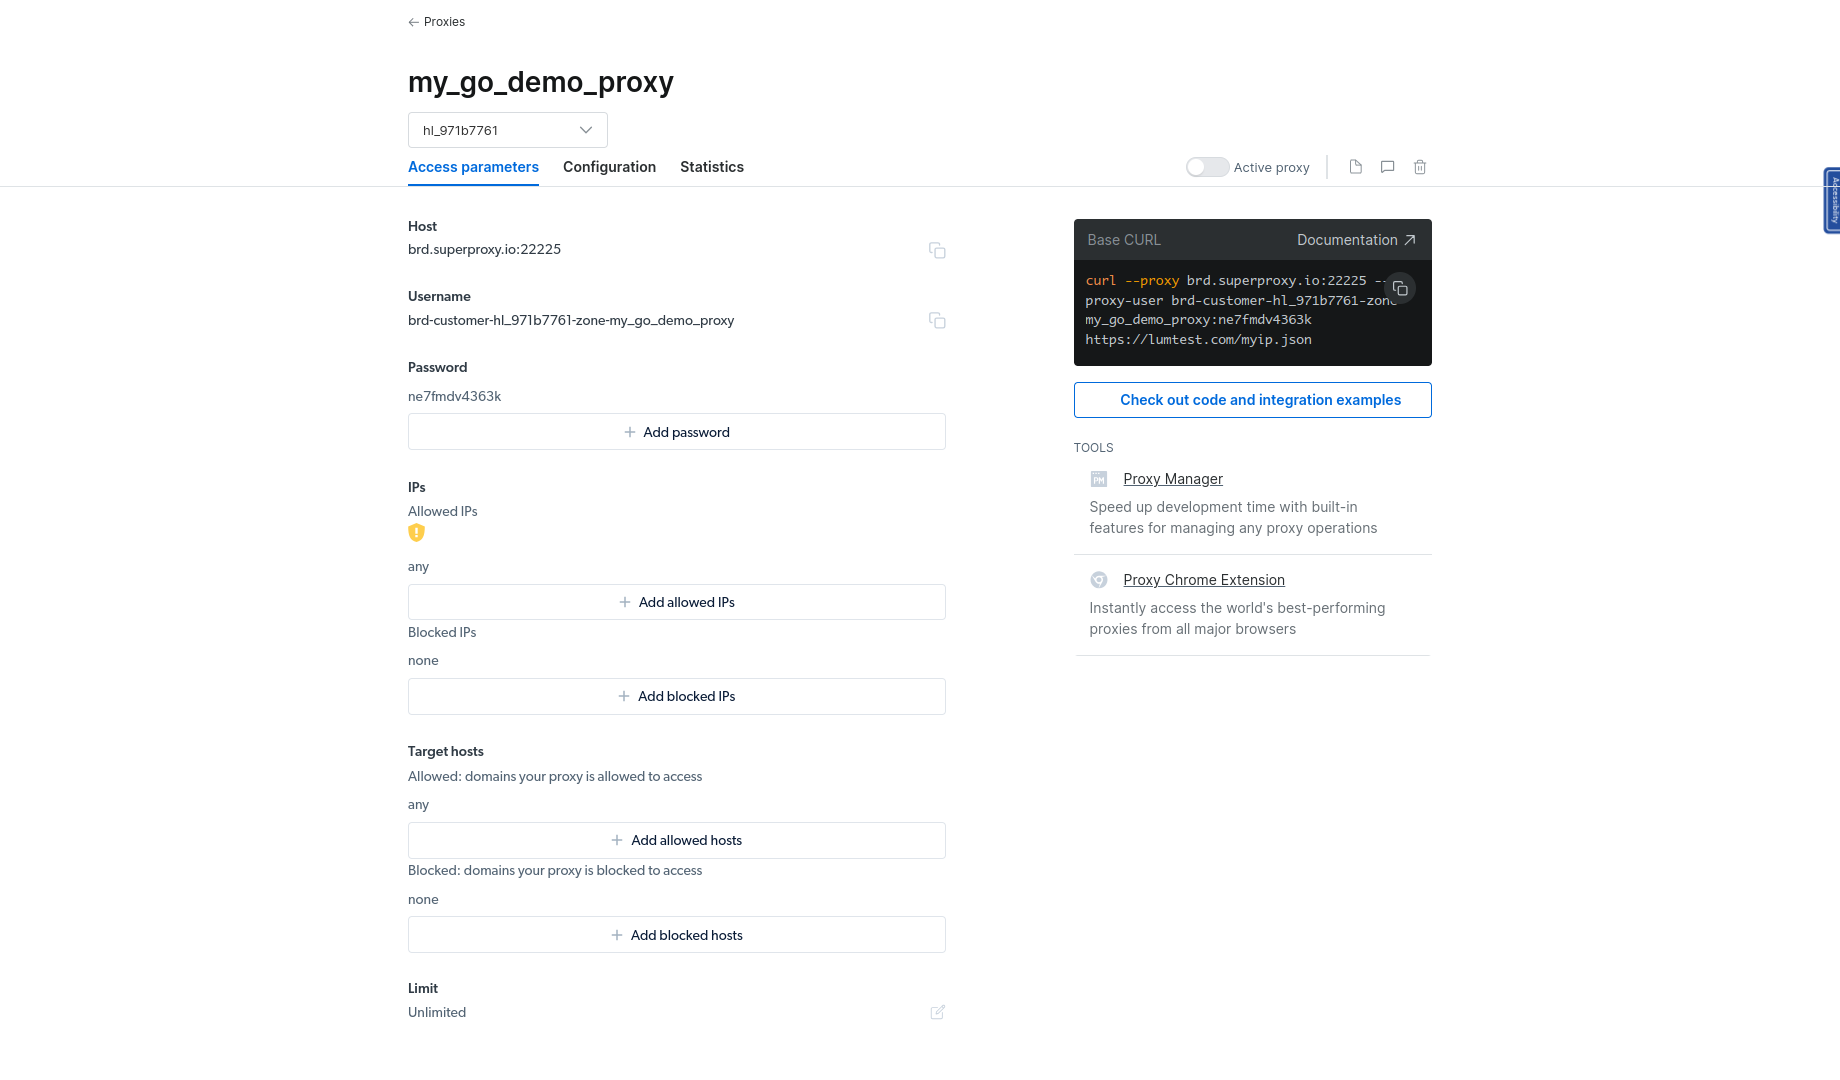
‘액세스 매개변수 ‘ 탭이 선택되어 있는지 확인하세요.
여기서 호스트, 포트, 인증 자격 증명 등 주거용 프록시 사용에 필요한 다양한 매개변수를 확인할 수 있습니다. 이 정보는 곧 필요할 것입니다.
이제 Bright Data 주거용 프록시를 스크레이퍼의 세 가지 구현 방식 모두에 통합할 차례입니다. 로컬 서버 설정과 유사한 과정이지만, 여기서는 인증 정보도 포함해야 합니다. 또한 웹과 프로그래밍 방식으로 상호작용하기 때문에, 그래픽 사용자 인터페이스가 있는 브라우저에서처럼 프록시 서버의 SSL 인증서를 검토하고 수락하는 것이 불가능할 수 있습니다. 따라서 요청이 중단되지 않도록 웹 클라이언트에서 SSL 인증서 검증을 프로그래밍 방식으로 비활성화해야 합니다.
프로젝트 디렉터리에 brightdata라는 디렉터리를 생성하고, 세 개의 .go 파일을 brightdata 디렉터리에 복사하세요. 디렉터리 구조는 다음과 같아야 합니다:
.nâââ brightdatanâ âââ colly.gonâ âââ goquery.gonâ âââ selenium.gonâââ chromedrivernâââ colly.gonâââ go.modnâââ goquery.gonâââ go.sumnâââ LICENSEnâââ README.mdnâââ selenium.gonn2 directories, 11 filesnn
앞으로 brightdata 디렉토리 내 파일을 수정하게 됩니다.
Bright Data 주거용 프록시와 함께 goquery 사용하기
ScrapeWithGoquery() 함수 내에서 proxyStr 변수를 수정하여 인증 자격 증명을 http://USERNAME:PASSWORD@HOST:PORT 형식으로 프록시 URL에 포함시켜야 합니다. 현재 정의를 다음 스니펫으로 대체하세요:
...nnfunc ScrapeWithGoquery() {n // Define the proxy server with username and passwordn proxyUsername := u0022usernameu0022 //Your residential proxy username n proxyPassword := u0022your_passwordu0022 //Your Residential Proxy password heren proxyHost := u0022server_hostu0022 //Your Residential Proxy Hostn proxyPort := u0022server_portu0022 //Your Port heren n proxyStr := fmt.Sprintf(u0022http://%s:%s@%s:%su0022, url.QueryEscape(proxyUsername), url.QueryEscape(proxyPassword), proxyHost, proxyPort)n n // Parse the proxy URLn...n
그런 다음 HTTP 클라이언트의 전송 계층 설정을 수정하여 프록시 서버의 SSL/TLS 인증서 검증을 무시하도록 구성해야 합니다. 먼저 crypto/tls 패키지를 임포트 목록에 추가하세요. 그런 다음 프록시 URL을 파싱한 후 http.Transport 정의를 다음 코드 조각으로 교체하세요:
...nnfunc ScrapeWithGoquery() {n n // Parse the proxy URLn...nn //Create an http.Transport that uses the proxyn transport := u0026http.Transport{n Proxy: http.ProxyURL(proxyURL),n TLSClientConfig: u0026tls.Config{n InsecureSkipVerify: true, // Disable SSL certificate verificationn },n }nn // Create an HTTP client with the transportn... n
이 스니펫은 로컬 프록시 서버를 사용하도록 구성된 전송을 통해 HTTP 클라이언트를 수정합니다. IP 주소를 사용 중인 프록시 서버의 주소로 반드시 교체하십시오.
프로젝트 디렉터리에서 다음 명령어로 이 구현을 실행하세요:
go run brightdata/goquery.go n
출력 결과는 다음과 같을 것입니다:
$ go run brightdata/goquery.go nnArticle 0: {u0022categoryu0022:u0022Newsletter âï¸u0022,u0022excerptu0022:u0022Open source rival to Twitter, a hyped new terminal and a cool new Brave/Chrome feature among many other things.u0022,u0022titleu0022:u0022FOSS Weekly #24.07: Fedora Atomic Distro, Android FOSS Apps, Mozilla Monitor Plus and Moreu0022}nArticle 1: {u0022categoryu0022:u0022Explainu0022,u0022excerptu0022:u0022Intel makes things confusing, I guess. Let's try making the processor naming changes simpler.u0022,u0022titleu0022:u0022Intel Processor Naming Changes: All You Need to Knowu0022}nArticle 2: {u0022categoryu0022:u0022Linux Commandsu0022,u0022excerptu0022:u0022The Cut command lets you extract a part of the file to print without affecting the original file. Learn more here.u0022,u0022titleu0022:u0022Cut Command Examplesu0022}nArticle 3: {u0022categoryu0022:u0022Raspberry Piu0022,u0022excerptu0022:u0022A UART attached to your Raspberry Pi can help you troubleshoot issues with your Raspberry Pi. Here's what you need to know.u0022,u0022titleu0022:u0022Using a USB Serial Adapter (UART) to Help Debug Your Raspberry Piu0022}nArticle 4: {u0022categoryu0022:u0022Newsletter âï¸u0022,u0022excerptu0022:u0022Damn Small Linux resumes development after 16 years.u0022,u0022titleu0022:u0022FOSS Weekly #24.06: Ollama AI, Zorin OS Upgrade, Damn Small Linux, Sudo on Windows and Moreu0022}nArticle 5: {u0022categoryu0022:u0022Tutorialu0022,u0022excerptu0022:u0022Zorin OS now provides a way to upgrade to a newer major version. Here's how to do that.u0022,u0022titleu0022:u0022How to upgrade to Zorin OS 17u0022}nArticle 6: {u0022categoryu0022:u0022Ubuntuu0022,u0022excerptu0022:u0022Learn the logic behind each step you have to follow for adding an external repository in Ubuntu and installing packages from it.u0022,u0022titleu0022:u0022Installing Packages From External Repositories in Ubuntu [Explained]u0022}nArticle 7: {u0022categoryu0022:u0022Troubleshoot ð¬u0022,u0022excerptu0022:u0022Getting a warning that the boot partition has no space left? Here are some ways you can free up space on the boot partition in Ubuntu Linux.u0022,u0022titleu0022:u0022How to Free Up Space in /boot Partition on Ubuntu Linux?u0022}nArticle 8: {u0022categoryu0022:u0022Ubuntuu0022,u0022excerptu0022:u0022Wondering which Ubuntu version youâre using? Hereâs how to check your Ubuntu version, desktop environment and other relevant system information.u0022,u0022titleu0022:u0022How to Check Ubuntu Version Details and Other System Informationu0022}nnCheck Proxy IP map[asn:map[asnum:7922 org_name:COMCAST-7922] country:US geo:map[city:Crown Point latitude:41.4253 longitude:-87.3565 lum_city:crownpoint lum_region:in postal_code:46307 region:IN region_name:Indiana tz:America/Chicago] ip:73.36.77.244]n
동일한 기사를 스크래핑하고 있음에도 프록시 IP 확인 결과가 달라진 것을 확인할 수 있습니다. 이는 다른 지역 또는 국가에서 접속한 것으로 표시됩니다.
Bright Data 주거용 프록시와 함께 Colly 사용하기
Colly는 SSL/TLS 검증을 프로그래밍 방식으로 비활성화하는 방법을 제공하지 않지만, HTTP 클라이언트가 사용할 자체 전송 계정을 제공할 수 있는 방법을 제공합니다.
에디터나 IDE에서 colly.go 파일을 열고, ScrapeWithColly() 함수 내부에 새 수집기를 초기화한 후 다음 코드 줄을 붙여넣으세요( net/url 및 net/http 임포트 추가를 잊지 마세요):
...nfunc ScrapeWithColly() {n ...n n //Create an http.Transport that uses the proxyn transport := u0026http.Transport{n TLSClientConfig: u0026tls.Config{n InsecureSkipVerify: true, // Disable SSL certificate verificationn },n }n n // Set the collector instance to use the configured transportn c.WithTransport(transport)n n n...n
이 코드 조각은 SSL 검증이 비활성화된 HTTP 전송을 정의하고, Colly의 WithTransport() 메서드를 사용하여 네트워크 요청에 대한 수집기의 전송을 설정합니다.
proxyStr 변수를 주거용 프록시 자격 증명 정보로 수정하세요(goquery에서 수행한 방식과 동일). proxyStr 라인을 다음 코드 조각으로 대체하세요:
...nn // Define the proxy server with username and passwordn proxyUsername := u0022usernameu0022 //Your residential proxy username n proxyPassword := u0022your_passwordu0022 //Your Residential Proxy password heren proxyHost := u0022server_hostu0022 //Your Residential Proxy Hostn proxyPort := u0022server_portu0022 //Your Port herenn proxyStr := fmt.Sprintf(u0022http://%s:%s@%s:%su0022, url.QueryEscape(proxyUsername), url.QueryEscape(proxyPassword), proxyHost, proxyPort)nn...n
주거용 프록시의 ‘액세스 매개변수’ 페이지에서 확인한 문자열 값으로 반드시 교체하세요.
다음으로 프로젝트 디렉터리에서 다음 명령어로 이 구현을 실행하세요:
go run brightdata/colly.gon
go run brightdata/colly.go nâ¦nnCheck Proxy IP map[asn:map[asnum:2856 org_name:British Telecommunications PLC] country:GB geo:map[city:Turriff latitude:57.5324 longitude:-2.3883 lum_city:turriff lum_region:sct postal_code:AB53 region:SCT region_name:Scotland tz:Europe/London] ip:86.180.236.254]nn
출력 결과의 “Check Proxy IP” 부분에서 동일한 자격 증명을 사용했음에도 국가가 변경된 것을 확인할 수 있습니다.
Bright Data 주거용 프록시와 Selenium 사용
Selenium 작업 시에는 자격 증명이 포함된 프록시 URL 문자열을 사용하도록 selenium.Proxy{} 정의를 수정해야 합니다. 현재 프록시 정의를 다음과 같이 교체하세요:
...nn // Define the proxy server with username and passwordn proxyUsername := u0022usernameu0022 //Your residential proxy usernamen proxyPassword := u0022your_passwordu0022 //Your Residential Proxy password heren proxyHost := u0022server_hostu0022 //Your Residential Proxy Hostn proxyPort := u0022server_portu0022 //Your Port herenn proxyStr := fmt.Sprintf(u0022http://%s:%s@%s:%su0022, url.QueryEscape(proxyUsername), url.QueryEscape(proxyPassword), proxyHost, proxyPort)nn // Define proxy settingsn proxy := selenium.Proxy{n Type: selenium.Manual,n HTTP: proxyStr,n SSL: proxyStr,n }n n...n
net/url패키지를 반드시 임포트하세요.
이 스니펫은 다양한 프록시 매개변수를 정의하며, 프록시 구성에 사용되는 프록시 URL을 생성하기 위해 병합됩니다.
이제 이전 구현과 유사하게 주거용 프록시 사용 시 SSL 검증을 비활성화하는 옵션으로 Chrome WebDriver를 구성해야 합니다. 이를 위해 chromeCaps 정의 인수를 다음과 같이 --ignore-certificate-errors 옵션을 포함하도록 수정하세요:
... n caps.AddChrome(chrome.Capabilities{Args: []string{n u0022u002du002dheadless=newu0022, // Start browser without UI as a background processn u0022u002du002dignore-certificate-errorsu0022, // // Disable SSL certificate verificationn }})n...n
기본적으로 Selenium은 인증된 프록시 구성을 지원하지 않습니다. 그러나 인증된 프록시 연결을 위한 Chrome 확장 프로그램을 구축하는 작은 패키지를 사용하여 이 문제를 해결할 수 있습니다.
먼저, 다음 go get 명령어로 패키지를 프로젝트에 추가하세요:
go get https://github.com/rexfordnyrk/proxyauthnn
그런 다음, 파일 상단의 import 블록에 "github.com/rexfordnyrk/proxyauth" 라인을 추가하여 brightdata/selenium.go 파일에 패키지를 임포트하세요.
다음으로 proxyauth 패키지의 BuildExtension() 메서드를 사용하여 Chrome 확장 프로그램을 빌드하고 Bright Data Residential Proxy 자격 증명을 함께 전달해야 합니다. 이를 위해 chromeCaps 정의 뒤, caps.AddChrome(chromeCaps) 줄 앞에 다음 코드 스니펫을 붙여넣으세요:
â¦n //Building proxy auth extension using BrightData Proxy credentialsn extension, err := proxyauth.BuildExtention(proxyHost, proxyPort, proxyUsername, proxyPassword)n if err != nil {n log.Fatal(u0022BuildProxyExtension Error:u0022, err)n }nn //including the extension to allow proxy authentication in chromen if err := chromeCaps.AddExtension(extension); err != nil {n log.Fatal(u0022Error adding Extension:u0022, err)n }nnâ¦n
이 코드 조각은 Chrome 확장 프로그램을 생성하고 Chrome WebDriver에 추가하여 제공된 프록시 자격 증명을 통한 인증된 웹 요청을 가능하게 합니다.
프로젝트 디렉터리에서 다음 명령어로 이 구현을 실행할 수 있습니다:
go run brightdata/selenium.gon
출력 결과는 다음과 같아야 합니다:
$ go run brightdata/selenium.go nnArticle 0: {u0022categoryTextu0022:u0022Newsletter âï¸u0022,u0022excerptu0022:u0022Check out the promising new features in Ubuntu 24.04 LTS and a new immutable distro.u0022,u0022titleu0022:u0022FOSS Weekly #24.08: Ubuntu 24.04 Features, Arkane Linux, grep, Fedora COSMIC and Moreu0022}nâ¦nArticle 8: {u0022categoryTextu0022:u0022Ubuntuu0022,u0022excerptu0022:u0022Wondering which Ubuntu version youâre using? Hereâs how to check your Ubuntu version, desktop environment and other relevant system information.u0022,u0022titleu0022:u0022How to Check Ubuntu Version Details and Other System Informationu0022}nnCheck Proxy IP {u0022ipu0022:u0022176.45.169.166u0022,u0022countryu0022:u0022SAu0022,u0022asnu0022:{u0022asnumu0022:25019,u0022org_nameu0022:u0022Saudi Telecom Company JSCu0022},u0022geou0022:{u0022cityu0022:u0022Riyadhu0022,u0022regionu0022:u002201u0022,u0022region_nameu0022:u0022Riyadh Regionu0022,u0022postal_codeu0022:u0022u0022,u0022latitudeu0022:24.6869,u0022longitudeu0022:46.7224,u0022tzu0022:u0022Asia/Riyadhu0022,u0022lum_cityu0022:u0022riyadhu0022,u0022lum_regionu0022:u002201u0022}}nn
다시 한번, 출력 하단의 IP 정보를 보면 요청 전송에 다른 국가가 사용된 것을 확인할 수 있습니다. 이는 Bright Data 프록시 로테이션 시스템이 작동 중인 모습입니다.
보시다시피, Go 애플리케이션에서 Bright Data를 사용하는 것은 간단합니다. 첫째, Bright Data 플랫폼에서 주거용 프록시를 생성하고 자격 증명을 획득합니다. 둘째, 해당 정보를 사용하여 웹에 프록시를 적용하도록 코드를 수정합니다.
결론
웹 프록시 서버는 인터넷에서 맞춤형 사용자 상호작용을 위한 핵심 구성 요소입니다. 본 문서에서는 프록시 서버에 대한 전반적인 이해와 Squid를 활용한 자체 호스팅 프록시 서버 설정 방법을 학습했습니다. 또한 로컬 프록시 서버를 Go 애플리케이션(본 사례에서는 웹 스크레이퍼)에 통합하는 방법도 알아보았습니다.
프록시 서버 작업에 관심이 있다면 Bright Data 사용을 고려해 보세요. 최첨단 프록시 네트워크를 통해 추가 인프라나 유지보수 걱정 없이 신속하게 데이터를 수집할 수 있습니다.